Hearing Hot Corner: The DigiLab Audio Field Kit
Part 2 of “The Hot Corner Project”
A project of Alexander M. Stephens (M.A. ’16)
In addition to the three oral histories about Hot Corner in the Russell Library Athens Oral History Project, Broderick Flanigan and I have conducted additional interviews specifically for the Hot Corner documentary we are producing through the DigiLab. We’re using the DigiLab Audio Field Kit to record our conversations. There are lots of great resources out there for people new to sound recording. Transom.org is one of my favorites for folks interested in radio, podcasts, and audio documentaries. And Doug Boyd, of the Nunn Center at the University of Kentucky and the Oral History in the Digital Age project, provides excellent resources for people working in the area of oral history. For starters, see Best Practices, information about tools, and Doug’s digital oral history blog. I am not going to go into too much detail about technique here, but I do want to use this post as a primer on the specific equipment we’re using, which will be available to students and faculty working through the DigiLab in the future.
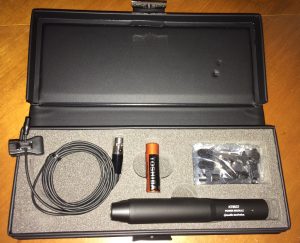
Here is a list of the equipment in the Field Kit, which all fits inside in a mall Ruggard backpack:
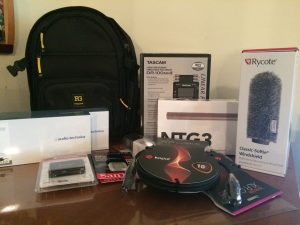
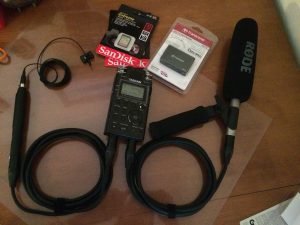
- Tascam DR-100MKII digital audio recorder
- Rode NTG-3 shotgun microphone (with foam windscreen)
- Auray Universal Shock Mount
- Auray Universal Hand Grip
- Two Audio-Technica AT899 lavalier microphones
- Rycote 18cm Classic-Softie Windshield
- Kopul Studio Elite 4000 XLR microphone cables
- Two Sandisk Extreme SDHC cards (one 16GB and one 32GB)
- Transcend USB 3.0 Multi-card reader
I’ll start with some basic concepts in sound recording. In my occasionally-professional opinion, the three biggest factors in getting good sound are 1) distance, 2) positioning, and 3) ambient (or surrounding) noise. (There are many resources for more information about sound recording and production online. This American Life has a comic book tutorial and, again, Transom.org has lots of tips.)
- As a general rule, the closer the source of the sound is to the microphone, the better it will sound on the recording. If you want it to sound like someone is right there in the room with you when you listen back to the recording, don’t be shy with the microphone(s). Get close—no more than a foot away in most cases. A shotgun mic can be held somewhat farther away.
- While it’s crucial to get the mic close to the speaker, don’t put it right in front of the speaker’s mouth. That may lead to distortions in the recording known as “plosives,” or it could pick up a person’s breathing or other mouth noises that aren’t (usually) desirable in an interview. The built-in mics on the Tascam and the Rode shotgun mic are “directional” mics, meaning that they pick up sound coming at them from particular directions. The lavalier mics are “omnidirectional,” meaning that they pick up sound in all directions. With directional mics, you’ll want to position them “off-axis” from the source of the sound. That means holding them at an angle to the speaker’s mouth. When I am holding the Rode shotgun mic, I usually find a comfortable way to hold it so that it is pointing directly at the speaker’s mouth but slightly upwards and at about a 45-degree angle. If you use a mic stand or a boom pole, you may want to position it off-axis and above the speaker so that it is pointed down at their mouth. As for the Audio-Technica lavalier mic, clip it on the speaker’s shirt about 6-8 inches below the mouth. For more on lavalier placement, see this video from Rode.
- There are endless sources of unwanted ambient noise that could interfere with the quality of your recording. Some common ones are air conditioning and heating systems, fans, refrigerators, fluorescent lights, and wind. Your task is to be aware of these sorts of sounds. People don’t usually notice these noises, but with a good mic and headphones, they become obvious. This is why wearing headphones while recording is KEY for ensuring the highest sound quality. It can be awkward to talk with big headphones on at first, but you’ll be glad when you don’t have to worry about a strange buzzing noise or a microwave beeping incessantly when you go to edit your recording. Headphones that cover your ears are usually better for isolating what is coming through the recorder than earbuds, but buds are better than nothing. Some radio producers will ask people to unplug refrigerators or turn off fans during interviews. I don’t usually go as far as the refrigerator, but if you do, make sure to plug it back in before you leave! I would recommend asking people to turn off air conditioning units in the room or fans for the duration of the interview, however, because those things are surprisingly loud.
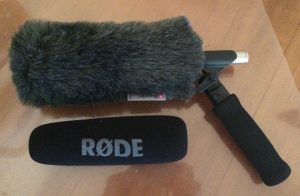
- When you’re recording inside, use the foam windscreen. It will provide a buffer for some unwanted noises and the whooshing sounds that can occur while moving the mic quickly. When it comes to recording outside, wind can be a major problem. Fortunately, you have the Rycote Classic-Softie windshield. Use it! Always. It is easy to forget about wind noise, but try recording outside with headphones on and no windscreen—the sensitivity of the shotgun mic will be pretty obvious, even in a mild breeze. Honestly, it wouldn’t hurt to keep the Rycote windshield on even when you’re recording inside. You’ll also want to be aware of “handling noise,” which can come from someone touching the cable or the mic itself. The shock mount and hand grip will help with this with the shotgun mic. With a lavalier mic, this sort of noise can come from someone’s shirt rubbing on the mic or even a beard rustling against it. Also ask that people avoid touching or messing with the cable to the lavalier mic, as that can create noise.
- Sometimes you want ambient noise, but for most interviews you will want to minimize it. Recording in a quiet environment and neutralizing ambient noise will make it possible to get a low “noise floor” on your recording. The noise floor is the baseline sound on your recording. When you don’t have lots of other sound, you place the mic close to the source of the sound, and you position the mic correctly, you can turn down the gain/input level on your recorder and get that magic quiet that allows people’s voices to shine through on the recording. In contrast, a high noise floor often distracts from the speaker’s voice and can make editing difficult when trying to put together clips that have varying levels of noise.
The tips above are meant to provide you with some basic knowledge about how to approach recording an interview. Now, I’ll go into more specifics about the recorder and the two types of mics in the kit.
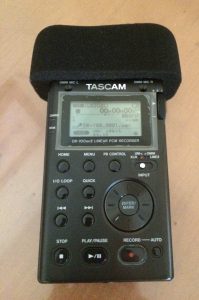 The Tascam DR-100MKII has become the recorder of choice for many oral historians and radio producers looking for a high-quality and affordable recorder with dual XLR inputs. The Tascam has lots of settings, which can be adjusted depending on your needs. The “Limiter” and “Low Cut Filter” switches on the back of the recorder are two important settings to think about. You’ll also want to adjust your “Record Settings.” For most projects, WAV files at 16-bit/44.1kHz will be sufficient. For archival projects, you may want to record in 24-bit/96kHz. Doug Boyd from the Nunn Center has some great tutorials on getting started with the Tascam Watch the video before doing anything with the recorder, follow his setup instructions, and check out his other videos for more useful information. The Tascam records to SD cards, and two SanDisk Extreme cards are included in the kit.
The Tascam will record two channels at once. If you have two microphones connected to the XLR inputs, one mic will register on the Tascam screen as the left channel and the other as the right channel. This enables you to isolate the sound for each mic (and thus for each speaker). The decibel levels of the sounds coming in through the mics can be controlled with the dial on the right-hand side of the recorder. Monitoring and adjusting your levels is really important. Practice adjusting the levels of each mic before your first interview, because it can be a bit tricky on the Tascam. I like my levels to peak between -12 dB and -6 dB, which is a little high, and recommendations on that vary. You want consistent, audible sound, and monitoring your input levels will help you get it. If you are interested in how levels really work and why they matter, see this Transom tutorial on levels.
The dual-XLR connections on the Tascam are great because of the sound quality they provide and because they enable using what is called “phantom power,” which a lot of microphones require, including the Rode NTG-3 shotgun mic in the kit. After you turn the recorder on, connect the microphone(s), and turn on phantom power by flipping the switch on the back of the Tascam. Turn off phantom power before connecting or disconnecting the microphone. Leaving phantom power on while connecting or disconnecting could damage the mic (at least according to the manual for the Tascam). The recorder has two built-in microphones, which are good but not great. They can be used in a pinch, perhaps if there are multiple people sitting around a table talking and you aren’t going to be able to manage a microphone throughout the whole recording. As long as everyone is reasonably close to the recorder and the setting is quiet, this will work well enough. Keep in mind that using the built-in mics on the Tascam won’t sound nearly as good as a recording with the external microphones.
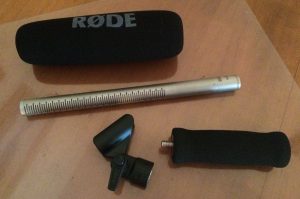
The Rode NTG-3 is an excellent, professional-quality shotgun microphone. Shotgun-style mics are directional and meant to be pointed at the source of the sound. It will reject sound from the sides and pick up sounds coming towards the end of the microphone. A lot of podcasts and radio programs are using this type of mic for field interviews nowadays, and so are we. The Auray shock mount and hand grip enable you to quickly move the microphone without creating handling noise, and thus pick up the voices of more than one speaker or isolate (to an extent) sounds that might be important for conveying information about the interview setting (clippers in a barber shop, for instance). If you are recording narration for a documentary-style story or commentary for a podcast, I recommend using the Rode mic on a stand and adjusting the position until you think it sound best. I’d start by placing the mic above your mouth (pointed at it), about 8 inches away, and off-axis.
- The two Audio-Technica AT899 mics included in the kit are high-quality lavalier microphones. If you are conducting a traditional sit-down oral history interview (with just two people), these two mics are the way to go. Put the battery in the power module for each mic and connect each one to an XLR input on the Tascam. See my note above about lavalier mic placement, and make sure to adjust the levels for each mic based on the loudness of each speaker.
Broderick and I are using both types of external mics to record our interviews, since there are two of us and we want to pick up multiple voices. I connect the Rode mic to the left XLR input on the Tascam. I hold the Rode during the interview and move it to point it at the person speaking—either Broderick or the person with whom we are talking. I connect a lavalier mic to the right XLR input and clip it to my shirt so that my questions are recorded clearly (it’s hard to point the Rode mic at myself). Of course, this is just one way to approach it. As you get familiar with the mics and their pros and cons, you will be able to figure out what will work best for your needs. One thing to watch out for with this method is the interference that can be created when the cables cross.
 Finally, after you are done recording, do not play back anything on the Tascam itself. Doing this could potentially corrupt the file. If you need to remove the card before you are ready to transfer the files, slide the switch on the side of the card to the “lock” position and put the card in the case. As soon as possible, use the Transcend card reader to transfer the files to a computer or external hard drive. Make sure the files are backed up before you erase anything from the card. The surest way to clear files from the card is to use the “Format” function when the card is in the Tascam recorder.
So, there it is: a primer on recording good sound using the equipment in the DigiLab Audio Field Kit. Take some time to watch and read the tutorials I linked to in this post. Take time to practice and make sure everything works before going out to do an interview! And, please, wear your headphones!
Aleck Stephens is a Graduate Research Assistant with the Willson Center Lab for Digital Humanities and is completing this project under the guidance of Professor Steve Berry of the UGA History department.
Broderick Flanigan is an artist and activist in Athens whose work brings narrative and art together. Check out his website fpsartsociety.com
Read more about the Hot Corner Project
![]()
For more information about the DigiLab or starting a new digital project contact the Emily McGinn, Digital Humanities Coordinator at UGA mcginn@uga.edu